This page explains how to enable SMTP authentication at network solutions for email clients on desktop, Mac OS, or mobile (iOS and Android).
Enable Network Solutions’ SMTP Authentication
In the previous article, you learned how to install Network Solutions’ Imap & Pop3 service on Mobile. In this article, we will guide you in enabling SMTP authentication for use on email clients.
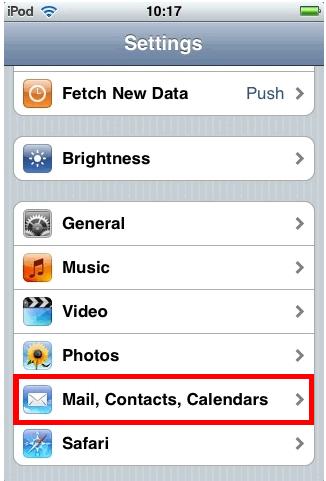
1. Click “Settings” from the home screen and select “Mail, Contacts, Calendars”
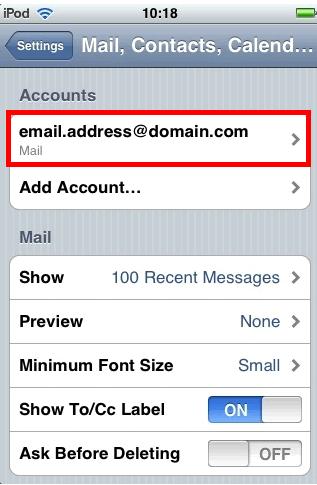
2. Select the email account you want to modify.
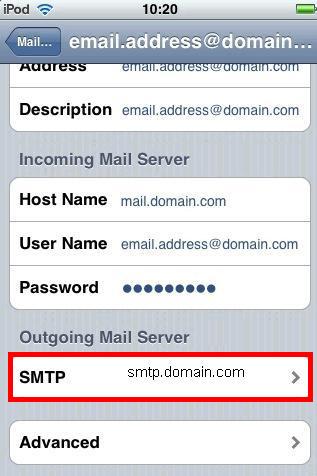
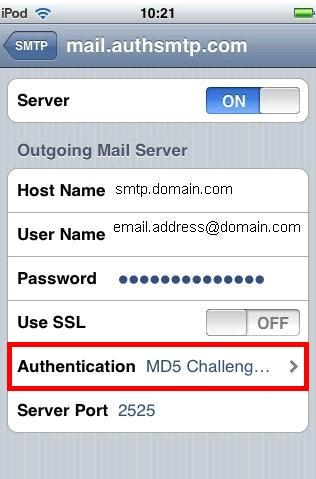
3. Click “SMTP” underneath the section that is titled “Outgoing Mail Server”
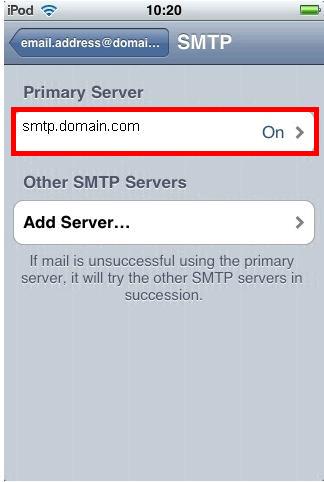
4. Click on your Primary Server
5. Select “Authentication”
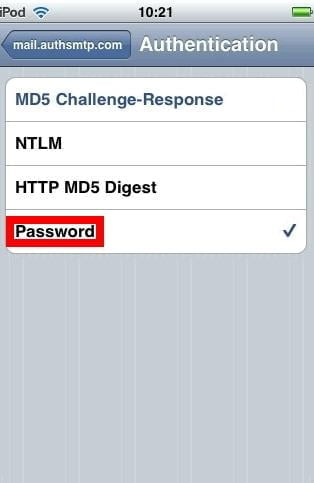
6. Select “Password”
7. Click back until you get to the “Settings” page. You have successfully enabled SMTP Authentication.
1. Select “Apps” and then “Email” from your main screen
2. Select the Account you want to update
3. Click your “Menu” button to access the Options menu
4. Click “Account Settings” then “Outgoing Settings”
5. Select the check box for “Require Sign-in.” and click “Next”
6. Enter your full email address and password in the “Username” and “Password” box
7. Click “Next”
8. Your device will attempt to verify the settings and will return you to the “Account Settings” screen. You have successfully enabled SMTP Authentication.
*** Note: The steps may vary depending on your Android OS.
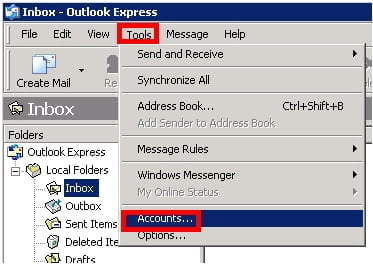
1. Select “Tools” and “Accounts” from the main screen once your Outlook Express is opened.
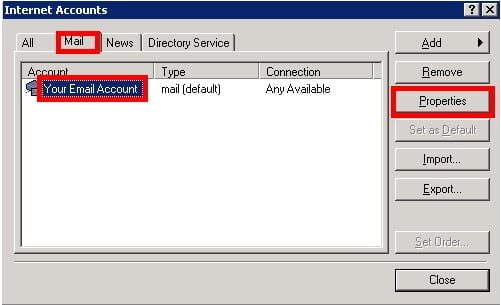
2. Select the “Mail” tab and select the account you wish to modify. Click “Properties”
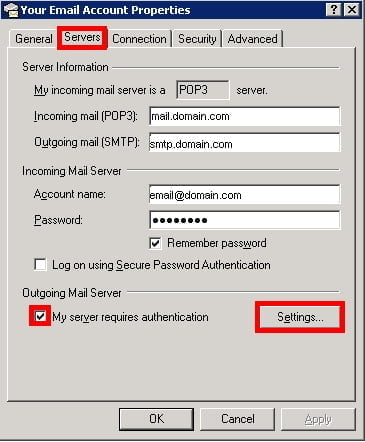
3. Click the “Servers” tab and select the check box next to “My server requires authentication” Click “Settings…”
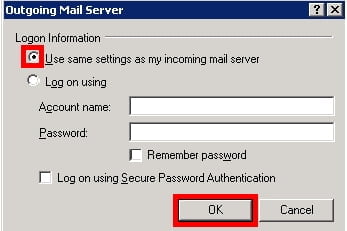
4. Select the radio button next to “Use same settings as my incoming mail server” and click “OK”
5. Click “OK” and then “Close“. You have successfully enabled SMTP authentication. Let’s restart your Outlook Express.
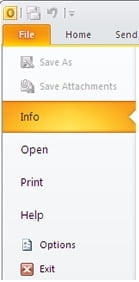
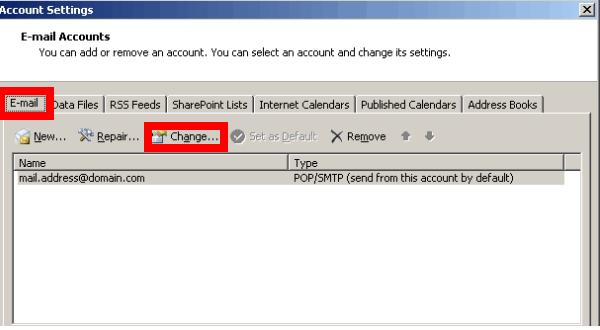
1. Once you have your Outlook opened, select “File” and then “Info”
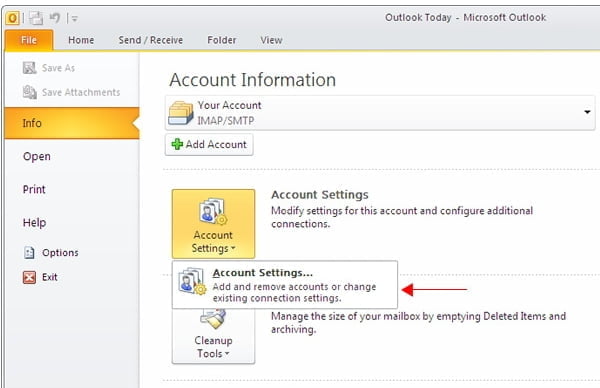
2. Click “Account Settings” and then in the drop down, select “Account Settings…”
3. Select your email account from the list and click “Change…”
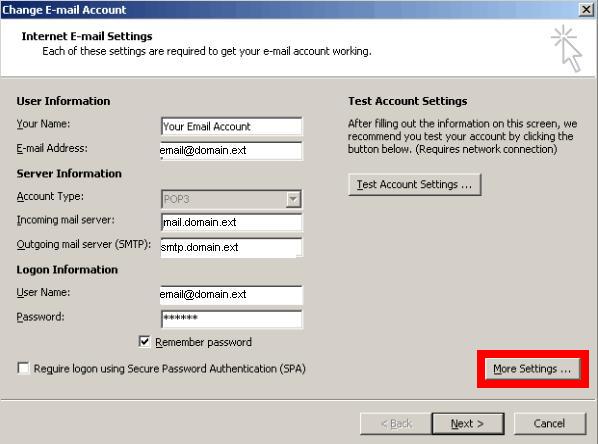
4. Click “More Settings…”
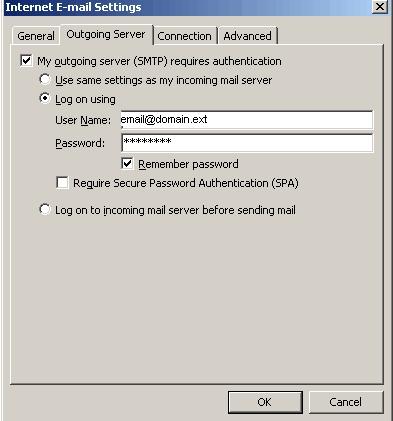
5. Select the “Outgoing Server” Tab and click “My outgoing server (SMTP) requires authentication” and “Use same settings as my incoming mail server“. Click “OK”
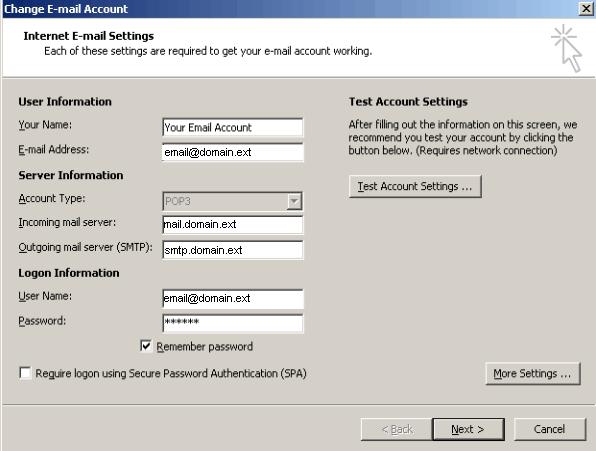
6. Click “Next“, “Finish“, “Close“. You have successfully enabled SMTP Authentication. Let’s restart your Outlook Express.
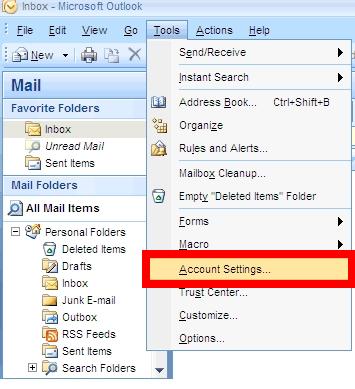
1. Once you have Outlook opened, select “Tools” from the main screen. Then select “Account Settings…”
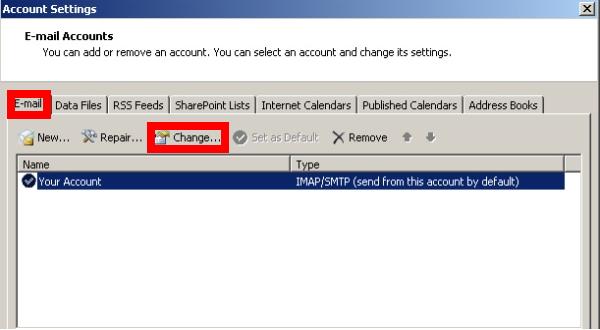
2. Select your email account and click “Change”
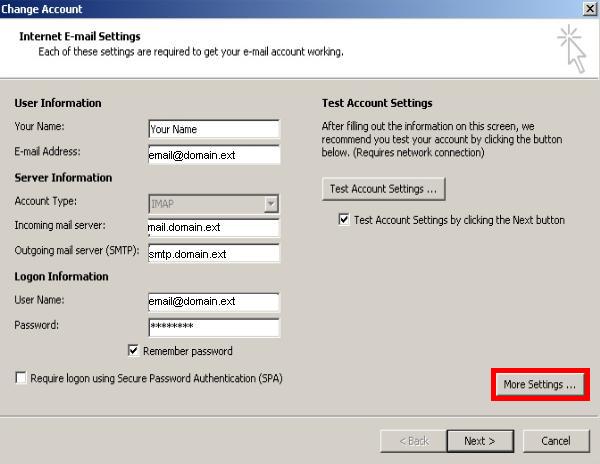
3. Select “More Settings…”
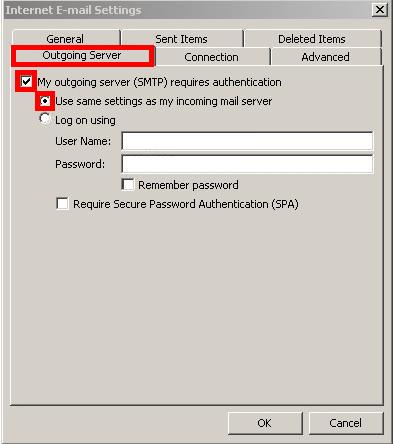
4. On the “Outgoing Server” tab, click the check box next to “My outgoing server (SMTP) requires authentication” and “Use same settings as my incoming mail server“. Click “OK”
5. Click “Next” and then “Finish” on the main screen, and you have successfully enabled SMTP Authentication.
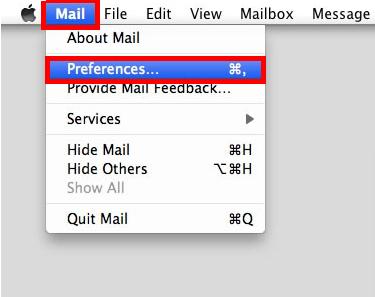
1. Click “Mail” and “Preferences” from the main screen and select the account you want to update
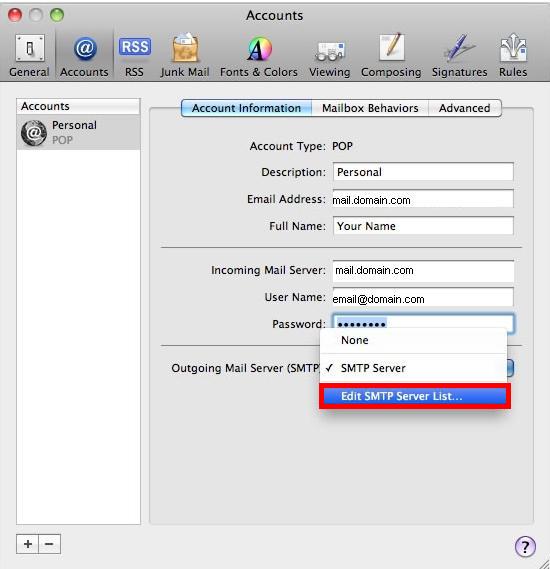
2. Click on the “Outgoing Mail Server” drop-down and select “Edit SMTP Server List…”
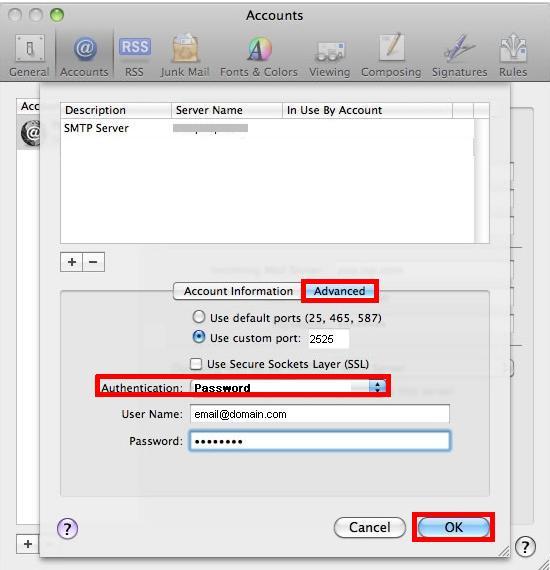
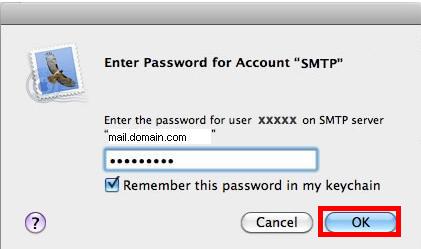
3. Click “Advanced” and select “Password“. Enter your full email address and password in the “User Name” and “Password” box and click “OK”
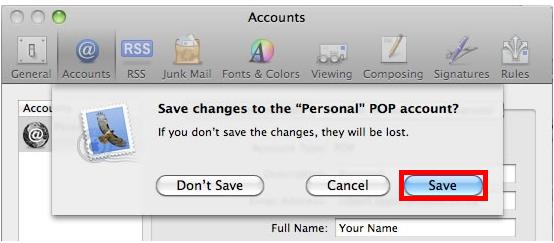
4. Close the window and click “Save” when prompted to save your changes. You have successfully enabled SMTP Authentication.
5. Note that the first time you click “Get Mail” you may need to re-enter your password again.
Windows
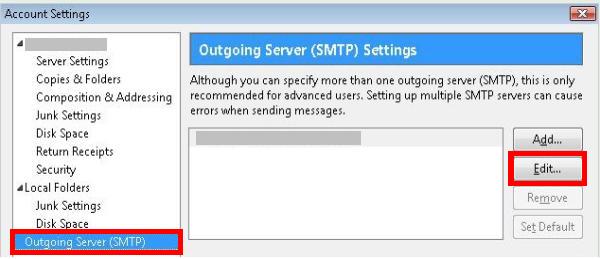
1. Click “Tools“, “Account Settings“, “Outgoing Server (SMTP)“, then “Edit”
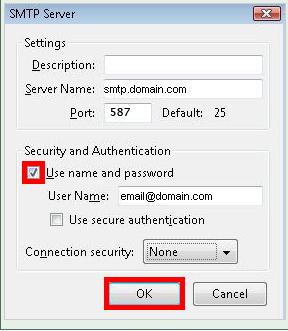
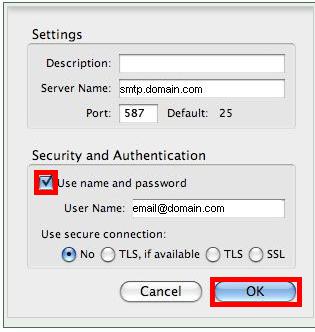
2. Select the check box next to “Use Name and Password“, and enter your full email address in the “User Name” box, and click “OK”
3. Click “OK” again, and you have successfully enabled SMTP Authentication
Mac OS
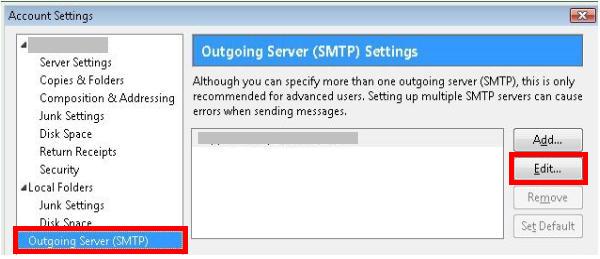
1. Click “Tools“, “Account Settings“, “Outgoing Server (SMTP)”, and then “Edit”
2. Select the check box next to “Use Name and Password“, enter your full email address in the “User Name” box, and click “OK”
3. Click “OK” again, and you have successfully enabled SMTP Authentication
Version Before 2011
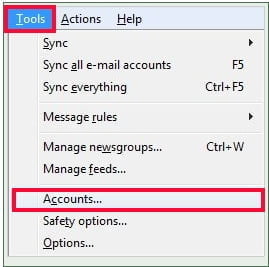
1. Click “Tools” then “Accounts”
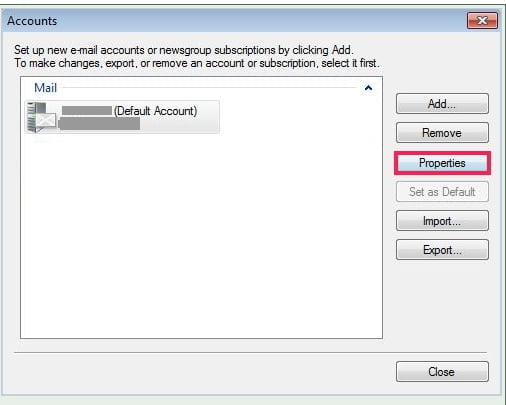
2. Select the email account you want to update and click “Properties”
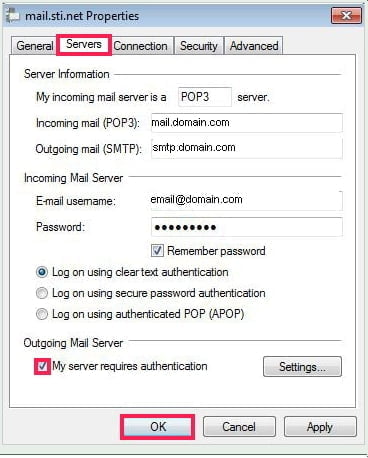
3. Click the “Servers” tab and check the box next to “My server requires authentication“. Click “OK” and you have successfully enabled SMTP Authentication
Version 2011 and Later
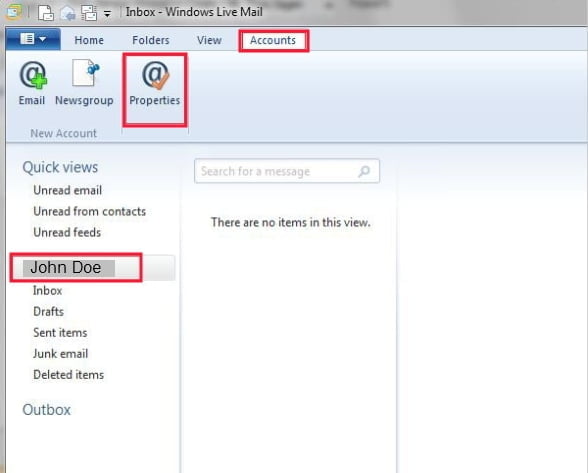
1. Click “Accounts“, select the account you want to update, and click “Properties”
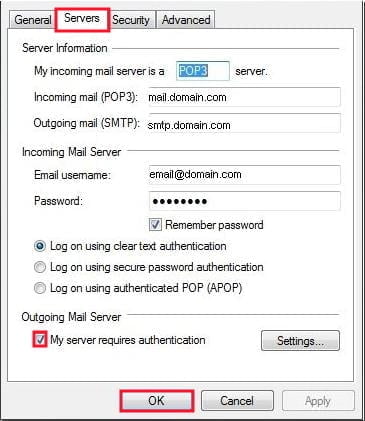
2. Click on the “Servers” tab and select the check box next to “My server requires authentication“. Click “OK” and you have successfully enabled SMTP Authentication.
I wish you success 🙂




1 Comment
I’m really enjoying the theme/design of your web site.
Do you ever run into any wweb browser compatibility issues?
A number of my blog readers have complained about my blog not operating correctly in Explorer but looks great inn Chrome.
Do you have any tips to help fix this problem?